|
|
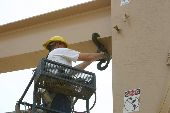
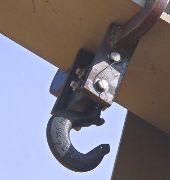
| |  | Using a Hobble-Clamp manufactured for this particular unit. Install the two side plates first, 6"-12" behind horse head or throat pin at the points previously measured . Then slip the center-block-hook assembley into place lining up the two 5/8" bolt holes, making sure that the hook opening is facing to the front of the unit at the head. |
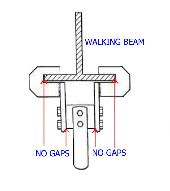
 | Use the appropriate number of shims to insure the side plates make contact with the beam and center block at same time. There must be NO gaps between the side plates and the center block when tight ! |
 | Use a minimum of 150 foot pounds of torque on both 5/8" grade 8 bolts. Use .041"-.047" stainless steel safety lock wire through the bolt heads to insure they dont back off or loosen up. Use wire twisting pliers to lock the wire tight. The Hobble-Clamp is not designed or manufactured to be interchanged in whole or in part with other units not of the same dimensions |  | WARNING ! WARNING ! WARNING ! IMPROPER INSTALLATION OF THE HOBBLE-CLAMP = THAT IS INSTALLATION IN ANY MANNER OTHER THAN EXACTLY PURSUANT TO THE PROSEDURES AND INSTRUCTIONS ABOVE COULD RESULT IN THE FAILURE OF THE HOBBLE-CLAMP , CAUSING PROPERTY DAMAGE, PERSONAL INJURY, AND/OR DEATH. IF YOU HAVE ANY QUESTIONS REGUARDING THE PROPER INSTALLATION OF THE HOBBLE-CLAMP CONTACT B&G MACHINE AND WELDING PRIOR TO INSTALLING. DO NOT RISK IMPROPER INSTALLATION UNDER ANY CIRCUMSTANCES. |
| | B&G MACHINE AND WELDING SHALL NOT BE LIABLE IN ANY MANNER FOR DAMAGES , INJURY OR DEATH RESULTING FROM, OR IN ANY WAY CONNECTED TO, IN WHOLE OR PART, THE IMPROPER INSTALLATION OF THE HOBBLE-CLAMP |
 | B&G MACHNE AND WELDING WILL MEASURE PUMPING UNITS PER YOUR REQUEST AND INSTALL A CUSTOM HOBBLE-CLAMP WITH LITTLE TO NO DOWN TIME FOR THE RIG CREWS ; SAVING YOU TIME AND MONEY. CALL TODAY; 661-322-7764 661-322-8621 | |
|
|